I reached back to the Explorer Bot project here and tried to incorporate the squirt gun used for that project by mounting it on a working turret. When the Explorer Bot project was going on, I found that AX12a servos did not have the torque required to manipulate the squirt gun. For this project, I used RX64 servomotors also from Trossen Robotics. The manual for these servos can be found here. These are extremely high-end servos with huge torque capacities. Unlike the AX12a's, there was little I could find online to show how to use these devices directly with the Arduino. They use an RS485 serial protocol and a packet system. There is programming support for the RX64's in the Arduino language, but the hardware connection could be bypassed by using a Arbotix microprocessor board. It uses the same chip as the Arduino and can be programmed using the Arduino IDE. It's a little more expensive that the Arduino, but it also has built is support for the AX12's (or the RX64's with the RX Bridge), a spot for Xbees, better headers for sensors, and support for optical encoders. It uses an FTDI serial interface rather than USB as the Arduinos do. I should stress that this is NOT plug and play for the RX64s or the AX12s. It took me some significant troubleshooting to get the servos working. The support network for the Arbotix is nowhere near as extensive as for the Arduino. Frankly I've found Trossen's support to be inadequate, but maybe that's just cause I do not know what I'm doing yet!
To first put the board through its paces, I ran a series of tests, which are described in this document: Arbotix I/O Testing Document. These allowed me to test the digital and analog inputs to the board, to see if it could run pulsed servos, to see if it could run an HB-25 motor controller (datasheet), and to see if it could read optical encoders on motors. I used the E4P optical encoders (datasheet) on Tetrix motors (datasheet) for my test platform.

Everything worked pretty well almost the first time around. The only troubleshooting that I had to do was for the HB-25 motor controller. I found that when I powered the HB-25 and the Arbotix off the same power supply (a 14.4V LiPo), the HB-25 did not work if both the board and the motor controller were turned on at the same time. However, if the HB-25 was turned on after a delay, it worked fine. So I have two switches wired to the LiPo. The first turns on the Arbotix. The second is in series with the first, and turns on the HB-25s.
Troubleshooting the RX64 motors was a harder task. This document describes the methods I used: RX64 Testing Document What I found was that if I tried to send commands to each servo individually, only the first servo actually moved. It did not matter how the servos were physically wired, just which servo was coded first. I posted on Trossen's forums and really got no help. So I dug into the manual for the RX64s, and found that you can send a syncwrite, which gives all the servos positions in one packet. I implemented this in my code and then was able to control both servos. This was very exciting for me.
In order to electrify the squirt gun, a Saturator Disruptor, I simply cut the wires going between the battery compartment and the motor, and soldered them to a female header. I zip-tied the trigger in the "on" position. I use a relay to turn the motor on and off. Here's the PCB board I used for this relay setup. It is the most compact board I've made. You can download the Eagle PCB files here.


The next step in the project was to provide a system for user control of the turret. I first worked to make a Processing sketch and a complementary Arbotix sketch so a computer could be used to move the turret, turn on/off the squirt gun, and move the motors in both directions. Eventually I also added support so that the Processing sketch could display some information read by the sensors (IR and encoders) wired into the Arbotix board. You can have insight into my process by checking out this document: Arbotix & Processing Initial Work.
 The user interface for the Processing sketch is shown at left. It allows me to see the sensor values being sent from the Arbotix. It also shows me the values which are being passed to the Arbotix or motor power, for the state of the gun (on/off), and for the turret location. A box moves to show where the gun is pointing. Finally, an emergency stop switch overrides the joystick and stops the motor, turns off the gun, and centers the turret. The emergency stop can be reset by clicking it again.
Here are the final working sketches for control of the gun/turrets and motors using a Logitech Dual Action Joystick and a Processing sketch.
Processing Sketch
Arbotix Sketch
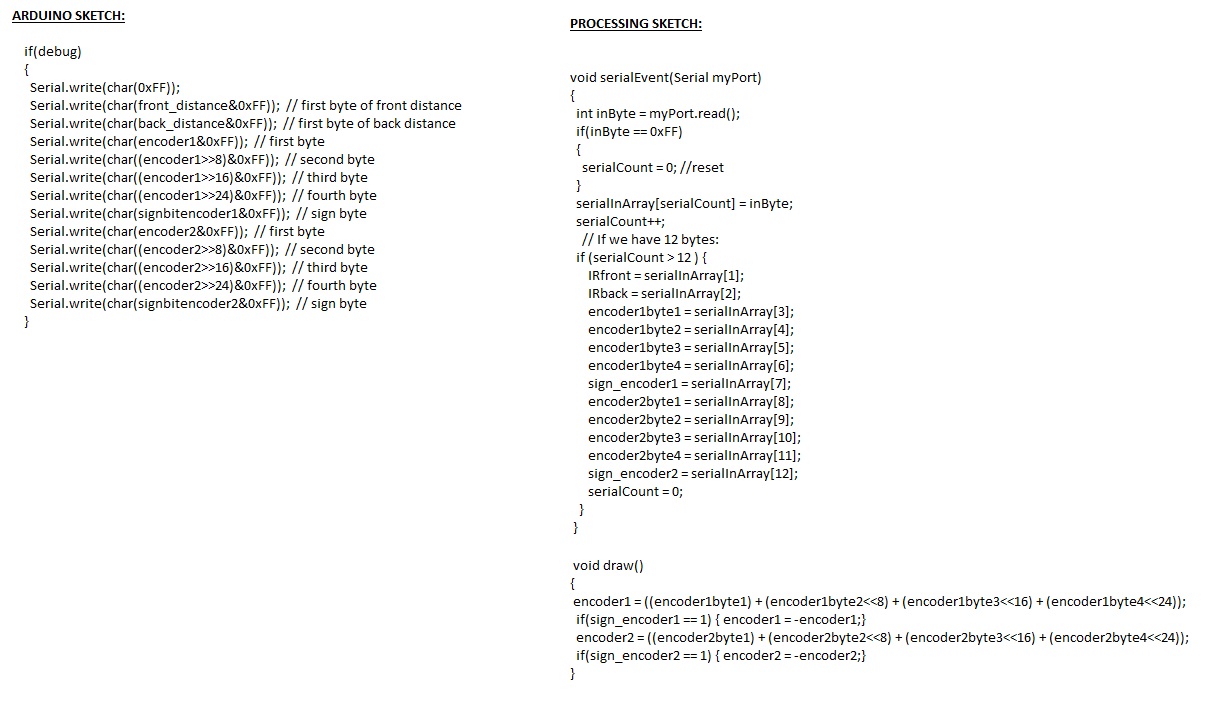
 One of the most challenging (and interesting) parts of the coding was learning how to send serial packets between two devices, and then parsing those packets. The screenshots show the send/receive pairing from the Arbotix sketch and the Processing sketch.
At this point I went forward and wanted to get an iPad to control the turret. But I'll leave that for another post.