
Chips:
I have three types of Atmega chips:
Atmega328 - PU
Atmega328P - PU
Atmega168A - PU
Chip Signatures
There are two issues that I ran into when using an ISP for these chips. First of all, each of the chips have a different signature. Those are summarized below:
Atmega328 - 0x1e 0x95 0x14
Atmega328P - 0x1e 0x95 0x0F
Atmega168 - 0x1e 0x94 0x0b
When you try to upload a program, AVRDUDE will check the signature it has on file and compare this to the one which the chip sends it. If there is a mismatch, you get an error such as the one shown below, which resulted when I tried to upload a sketch to an Atmega168 while the Arduino IDE was set to look for an Atmega328.

The signatures are stored in a file called avrdude.conf located in /hardware/tools/avr/etc. If you open this text file and search for Atmega328, you will see (on my computer) the following:

I have added both to the signatures for the Atmega328. One is commented out. By switching which is commented out, I can choose whether the Arduino IDE is looking for an Atmega328 or an Atmega328P.
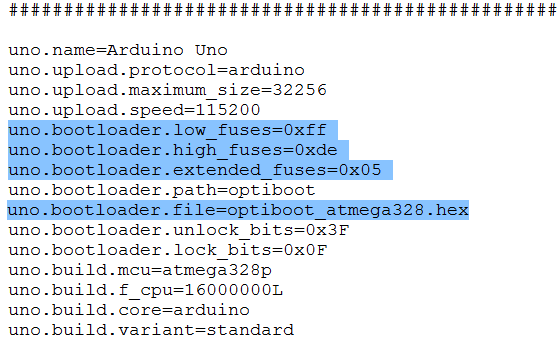
So how does the Arduino IDE know which chip goes with which board? When you select a Board under Tools -> Boards, it consults a text file called boards.txt located in /hardware/arduino. A portion of the boards.txt file is shown below which shows the settings for an Arduino UNO.

The highlighted section means that when the Arduino UNO is the selected board, avrdude is looking for the part with id "m328p" in the file avrdude.conf. The part with that id is the Atmega328P shown in the previous picture. Many of the boards for this particular version of the Arduino IDE (1.05) have the same selector "m328p" including Arduino Mini w/ Atmega328, Arduino Ethernet, Arduino BT w/ Atmega328, Lilypad Arduino with Atmega328, Arduino Pro or Pro Mini w/Atmega328.

Similarly, many boards have the part id "atmega168".
Fuses/Bootloader
If you choose the correct chip and have the correct signature, you can upload a program, such as the blink program, via the ISP. But you will find that the timing is wrong. Normally, the blink program turns on and off an LED with a period of 2 seconds.
void setup()
{
pinMode(9, OUTPUT);
}
void loop()
{
digitalWrite(9, HIGH);
delay(1000);
digitalWrite(9, LOW);
delay(1000);
}
However, when I uploaded this program I found that it was blinking 16 times slower, with a period of 32 seconds. The Atmega chips are preloaded with a set of fuses. There is an excellent discussion of these fuses at this URL. The default fuse settings allow the chip to use an internal 8MHz oscillator and divide the clock by 8 for an effective 1 MHz clock. However, the Arduino settings assume that the chip will be using an external 16MHz oscillator. You can see this by looking at the value next to *.build.f_cpu which is 16000000L for the majority of the boards in boards.txt. This value is 16 million, or 16 mega (since mega = 10^6).

To fix the timing program, you either need to change the boards.txt so that the value of build.f_cpu is 1000000 (1 mega) or better, change the fuses. The fuse settings which are the defaults for Arduino microcontrollers are shown below:
UNO/Ethernet Atmega328/Atmega328P:
low_fuses=0xFF
high_fuses=0xDE
extended_fuses=0x05
bootloader: optiboot_atmega328.hex
NANO/Duemilanove/Fio/Lilypad/Pro/Pro Mini w/ Atmega328/Atmega328P
low_fuses=0xFF
high_fuses=0xDA
extended_fuses=0x05
bootloader: ATmegaBOOT_168_atmega328*.hex
MINI/Bluetooth w/ Atmega328/Atmega328P
low_fuses=0xff
high_fuses=0xd8
extended_fuses=0x05
bootloader: optiboot_atmega328-Mini*.hex
Most Atmega168 devices
low_fuses=0xFF
high_fuses=0xDD
extended_fuses=0x00
bootloader: ATmegaBOOT_168.hex or ATmegaBOOT_168_diecimila.hex
The fuses are set when you burn the "bootloader" to the chip, and you can see that each of the previous different cases above corresponds to a different bootloader file.

Summary
Here is the process for getting a new chip up and running:- Upload a blink program. Make sure that you have selected a board with the correct signature. The blink program will be 16 times too slow in its period.
- Burn the bootloader to the chip. Make sure that you have selected a board with the correct bootloader file (I use ATmegaBOOT_168_atmega328.hex for the Atmega328s and ATmegaBOOT_168.hex for the Atmega168s).
- Re-upload your blink program. The timing should be correct now.
Here are the customized versions of avrdude.conf and boards.txt which I have setup. I made two new entries in board.txt for the atmega328 with a 16MHz crystal and the atmega168 with a 16Mhz crystal.
